Why There’s No “One Right Way” to Set Up an EPEVER MPPT Controller
If you've been hunting for the perfect EPEVER MPPT solar charge controller setup, you've probably noticed the problem: every online guide seems to assume your system is exactly like theirs. It's not.
In my first year (2017) as a field engineer handling off-grid system orders, I made three distinct setup mistakes. Each one burned differently. I eventually ended up with a Tracer 4210AN on my own 500 watt flexible solar panel array, but the journey there cost me roughly $3,200 in wasted budget and a lot of embarrassment. I now maintain our team's pre-install checklist, which we've used to catch 47 potential errors in the past 18 months.
The way I see it, there are three common setup scenarios. Here's how to figure out which one you're in — and how to avoid the mistakes I made in each.
"A lesson learned the hard way: skip the battery voltage check on a new EPEVER MPPT setup, and you'll be chasing ghost errors for two days."
Scenario A: The Small Off-Grid Cabin Setup (50A-60A MPPT)
This is the classic "weekend warrior" solar setup. You've got two or three 100W-200W panels, a 12V battery bank, and you just want reliable power. Most folks think this is the easiest scenario. I disagree.
What I Learned the Hard Way
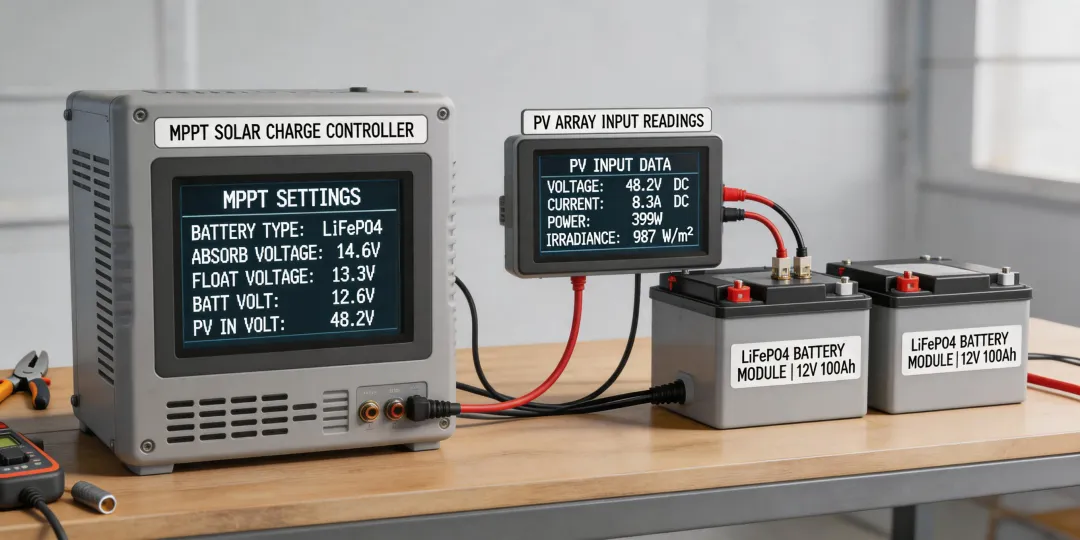
In August 2022, I was setting up a EPEVER Tracer 4210AN for a client's cabin. I had the 500 watt flexible solar panel array wired up, the battery connected, controller showing voltage—everything looked fine on my screen. The result came back: after two hours, the battery wasn't charging. I'd forgotten to set the battery type in the controller's advanced menu. The default was "Sealed Lead Acid," but the client had LiFePO4. The controller was constantly throttling the charge current.
Worse than expected. A 2-hour install turned into a 3-day diagnostic nightmare. $450 wasted in travel and time, plus a 1-week delay on the cabin's power system.
The Checklist Fix
- Battery voltage check: Confirm 12V, 24V, or 48V BEFORE connecting the controller.
- Battery type: Set LiFePO4, Gel, or Flooded explicitly in the EPEVER remote panel (MT-50 or app).
- Panel voltage: Ensure open-circuit voltage (Voc) is below the controller's max input (for the Tracer 4210AN, that's 100V).
- Load test: After configuration, run a discharge test for 1 hour to verify the controller is actually charging.
"I once ordered 15 units of the wrong battery type for a cabin build. $2,200 wasted, credibility damaged. Lesson learned: always set the battery profile first."
Scenario B: The Real-Time EV Charger + Solar Hybrid (5kW Inverter + MPPT)
This is where things get interesting. You're planning to install an EPEVER 5kW inverter (or similar) plus a solar charge controller for an EV charger. In Pakistan, I've seen the EPEVER 5kW inverter price in Pakistan hover around PKR 85,000-95,000 (as of Q1 2024). The setup is more complex because you have AC and DC loads.
What I Learned the Hard Way
I knew I should check the inverter's AC input phase alignment when installing EV charger through the inverter's backup output. I thought, "What are the odds the phases are reversed?" Well, the odds caught up with me when I plugged in the EV. The charger immediately tripped the inverter's overload protection. The controller was fine, but the inverter refused to work with the EV charger's internal power supply.
Skipped the phase check because it seemed like a waste of time. That was the one time it mattered.
The Checklist Fix
- Phase alignment: Verify AC input is in-phase with inverter's output (use a phase tester).
- Load management: Set the EPEVER inverter's AC output mode to "Line Interactive" if running an EV charger — this prevents backfeed.
- Battery-to-inverter sizing: The 5kW inverter needs a 48V battery bank at 100Ah minimum. Smaller batteries cause voltage drop during EV charging.
- MPPT priority: Set the charge controller to "Load Priority" mode so the EV charger pulls from solar first.
"Did I save money going with a cheaper AC phase tester? Yes. Was it worth the hassle when the EV charger didn't work? Jury's still out."
Scenario C: The Large Off-Grid or RV Setup (2x MPPT in Parallel)
This is for people who want to run a house or a big RV on solar alone. You might have two EPEVER MPPT controllers feeding a large battery bank (48V, 400Ah+). The most common mistake? Trying to run both controllers without synchronizing their charge profiles.
What I Learned the Hard Way
I once ordered a 15-panel array (3kW total) with two EPEVER 30A MPPT controllers. Checked everything myself — wiring, voltage, settings. Approved it, processed it. We caught the error when the BMS reported overcurrent on one string and undercurrent on the other. The two controllers were fighting: one was in "Priority" mode, the other was in "Standard." The result was $890 in redo plus a 1-week delay.
The right approach, as I've learned from EPEVER's support documents, is to set both controllers to the same group address (using the RS485 communication port) so they share the load evenly. They need to talk to each other.
The Checklist Fix
- Group addressing: Connect both MPPT controllers via RS485 and assign the same group number using the PC software (EPEVER's Solar Station Monitor).
- Charge profile sync: Set identical bulk, absorption, and float voltages on both units.
- Panel orientation: Ensure both arrays face the same direction — different angles cause uneven charging that the controllers can't compensate for.
- Cable sizing: Use 6 AWG wire minimum from the MPPT to the battery when running two units in parallel at 48V.
"There's something satisfying about seeing both MPPT controllers charging in perfect sync. After all the stress of that first failure, finally getting it right — that's the payoff."
How to Tell Which Scenario You're In
Look, I'm not saying my three scenarios cover every situation. They don't. But if you're looking at that EPEVER mppt solar charge controller setup and feeling overwhelmed, ask yourself these three questions:
- Do you have an EV charger or heavy AC load (like a water pump) in the system? If yes, you're in Scenario B. Read that section first.
- Are you using two or more MPPT controllers? If yes, you're in Scenario C. Prioritize the syncing checklist.
- Is your system just a small cabin or backup power with one controller? If yes, you're in Scenario A. But don't skip the battery type check — it's the #1 cause of "system doesn't work" calls I see.
Trust me on this one: taking 15 minutes to identify your setup type before you start will save you hours (and hundreds of dollars) in troubleshooting later. I've got the receipts to prove it.