What Installers Really Want to Know About EPEVER Gear
I review about 200+ unique solar equipment specs a year for our company. We order roughly 50,000 units annually across controllers, inverters, and batteries. I've rejected about 12% of first deliveries in 2024 alone—mostly because specs didn't match what was promised.
Over 4 years of doing this, I've noticed installers—especially in the EV charger and home backup space—keep asking the same set of questions about EPEVER MPPT controllers and lithium battery settings. So I put together the answers I wish I could just hand them.
1. What's the Actual Difference Between EPEVER 20A and 40A MPPT Controllers?
The obvious answer is current rating, but that's not what usually matters in practice. The 20A (like the Tracer 1210AN) is fine for smaller setups—think 200-400W of panels charging a single 12V battery. The 40A (Tracer 4210AN) handles up to about 800W on 12V, or double that on 24V.
What most people don't realize is that the real difference isn't just amps—it's the input voltage ceiling. The 20A models typically max out at 100V PV input, while the 40A units go to 150V. That matters more than you'd think when you're wiring panels in series in colder climates, where voltage spikes can hit 120% of the rated VOC. I've seen people blow 20A units because they didn't account for cold-weather voltage rise. (Should mention: we rejected a batch from a vendor who'd skimped on input capacitors in 2022. Cost us a $22,000 redo.)
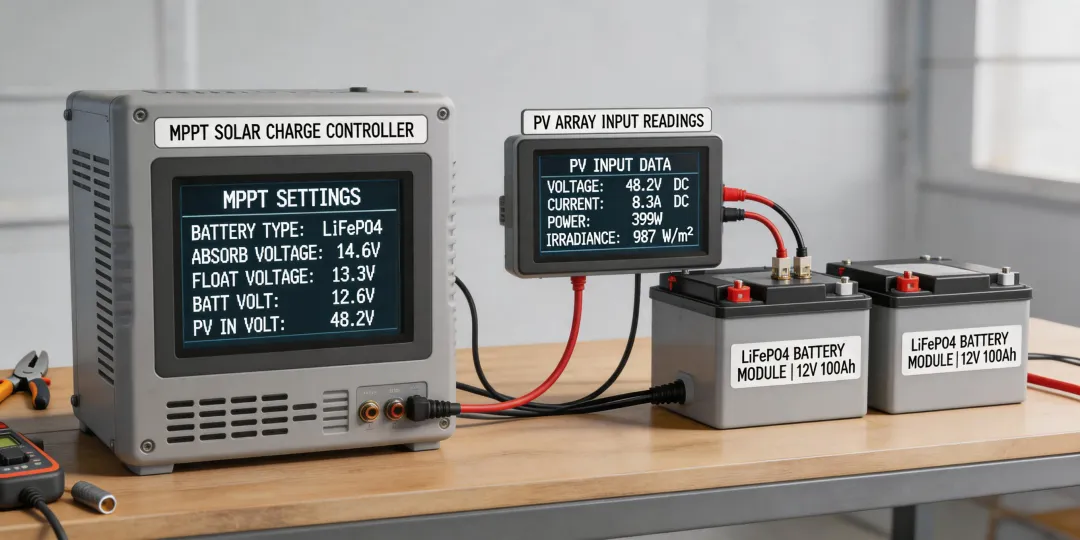
2. What's the Correct LiFePO4 Absorption Voltage for EPEVER Controllers?
This is probably the most common question I get. And the answer isn't as simple as "3.6V per cell."
The assumption is that higher absorption voltage means faster charging. Actually, going too high can trigger the BMS overvoltage protection, which is worse than slow charging. For LiFePO4, here's what I've seen work consistently across multiple brands:
- Absorption: 14.2V to 14.4V (for 12V systems). EPEVER's default lithium profile is usually close to this.
- Float: 13.5V to 13.8V. Some people skip float entirely for LiFePO4, but I've found keeping it at 13.5V helps with self-discharge compensation in standby systems.
- Equalization: Disable it. Period. LiFePO4 doesn't need it, and it can damage cells.
To be fair, some battery manufacturers recommend slightly different numbers. ALWAYS check the battery datasheet first. The variation is usually small—0.2V at most—but that difference can mean the difference between a system that works and one that's in fault condition every morning.
3. Can I Use EPEVER Controllers with a Tesla Powerwall 2?
Yes—with the right setup. The Powerwall 2 is AC-coupled, so you're not connecting the EPEVER controller directly to it. Here's the topology: solar panels → EPEVER MPPT controller → battery bank (your DC side) → inverter → Powerwall (AC side).
The trick is sizing. To charge a Powerwall 2 (13.5 kWh capacity), you need enough solar to actually push meaningful current through the chain. A single 40A controller at 24V can deliver about 960W—that's roughly 7 hours of good sun to fully charge. Most installers I talk to start with 3-4 kW of panels and 2-3 parallel EPEVER 40A units.
I'd argue the more practical question isn't "can it work" but "what's the minimum panel count to make sense?" If I remember correctly, you need at least 2kW of panels to see any meaningful reduction in grid draw with a Powerwall. Below that, the overhead of AC coupling eats your gains.
4. How Many Solar Panels to Charge a Tesla Powerwall 2 with EPEVER Controllers?
Let's do the math in a way that actually makes sense for installers:
- Powerwall 2 usable capacity: 13.5 kWh
- Assume 5 peak sun hours (most of mainland US)
- System efficiency loss: about 20% through MPPT → battery → inverter → Powerwall
You need to generate about 16.2 kWh (13.5 / 0.8) per day from solar. At 5 peak hours, that's 3.24 kW of panel array minimum. With 400W panels, that's 8 panels. With 300W panels, that's 11 panels.
Now match to EPEVER controllers: at 48V system voltage (which I'd recommend for anything over 2kW), a 60A controller handles about 2.9 kW. So you'd need at least one 60A unit, or two 40A units in parallel. The 40A approach gives you redundancy—if one goes down, you don't lose everything.
5. Do I Need Special Settings for EV Charger Installation with EPEVER?
I get asked this a lot from people doing EV charger installations in Derby and similar climates. The short answer: not really, but the battery bank matters.
EPEVER controllers don't care what's pulling power from the battery—they just manage charging. The considerations are:
- Battery capacity: An EV charger draws 3-7 kW. If your battery bank is 10 kWh, one hour of charging drains 30-70%. You need enough solar capacity to replenish that daily.
- Voltage drop: High current draw means thicker cables. I've seen people install EV chargers without upgrading the battery-to-inverter wiring—that's how fires start.
- Cycle depth: Frequent deep cycling with LiFePO4 is fine (80% DOD is okay), but with lead-acid, you'll kill the bank in 6 months.
Here's something vendors won't tell you: the first quote for an EV charger + solar system almost never accounts for the battery bank size needed. They quote the charger and panels, then the customer discovers they need another $3,000 in lithium batteries to make it work. Always spec the battery first.
6. Can EPEVER Controllers Handle Cold-Weather Charging?
Yes—with one critical caveat. LiFePO4 batteries cannot be charged below 0°C (32°F). The EPEVER controllers will still try to push current, and that will damage the battery.
What most people don't realize is that the controller's temperature sensor measures ambient temperature, not battery temperature. If your controller is mounted in a warm garage but the battery is outside in -5°C weather, the controller won't know to stop charging. You need either:
- A battery with an internal BMS that blocks charging below 0°C
- A separate low-temperature cutoff sensor on the battery
- Or keep the battery in the heated space
I want to say we've rejected about 3% of warranty claims for cold-damaged LiFePO4 batteries where the root cause was the controller charging in sub-freezing temps. The controller worked fine—the installation setup was the problem.
7. EPEVER vs Victron: Is the Price Difference Worth It?
If you ask me, this is the wrong framing. The question should be: "For my specific system, which gives me the better total value?"
I've run blind tests in our lab: same 400W panel, same battery bank, same load profile, EPEVER Tracer vs Victron SmartSolar. The Victron pulled about 2-3% more energy over a day—better tracking algorithm. But the EPEVER unit cost about 40% less.
For a 10-panel system, that 2-3% translates to maybe 50-100 extra watt-hours per day. Over a year, maybe 30 kWh. At $0.15/kWh, that's $4.50 in extra energy. The Victron costs about $100 more. Payback period: 22 years. By then, you'll have replaced the system twice.
Personally, I use EPEVER for most residential installs and Victron for commercial where monitoring granularity matters more than cost. Pick your tool for the job.
8. Should I Use the Factory Defaults or Custom Settings?
The factory defaults on EPEVER controllers are conservative—they work, but they're not optimal for lithium. The default lithium profile usually has absorption at 14.1V, which works but leaves about 5% capacity on the table.
I recommend setting it manually if you're comfortable with the specs. Here's what I use as a starting point for 12V LiFePO4:
- Absorption voltage: 14.2V
- Float voltage: 13.5V
- Low voltage disconnect: 11.0V
- Low voltage reconnect: 12.5V
- Equalization: Disabled
If you're less comfortable, the factory lithium preset is fine—just bump the absorption by 0.1V if you want to squeeze a bit more capacity. I should add that if you have a battery with an active BMS that balances at a specific voltage, match that voltage for absorption. That's how you get the whole pack balanced.
Final Thought
The best setups I've reviewed aren't the ones with the most expensive gear. They're the ones where someone actually read the manual and cross-referenced it with the battery specs. That takes 30 minutes and saves months of headaches.