-
Who this checklist is for
-
Step 1: Define the load and the backup window
-
Step 2: Size the epever 40a mppt solar charge controller before you buy the label
-
Step 3: Set epever lifepo4 settings before the first charge
-
Step 4: Answer the real question: how do you charge a lifepo4 battery?
-
Step 5: Compare bluetti solar generator amazon prime day deals against components
-
Step 6: Price denver ev charger installation like a project
-
Step 7: Build a TCO spreadsheet and force vendors into the same scope
-
Step 8: Verify for 30 days and audit the invoice
-
Common mistakes to avoid
-
Final check before you approve the order
Who this checklist is for
If you are sourcing an off-grid solar system for a small commercial site, a cabin, a mobile setup, or a backup power build, this checklist is for you. I am a procurement manager at a 40-person solar and electrical contractor. I have managed about $180,000 a year in equipment spend for six years, negotiated with more than 20 vendors, and tracked every invoice in our cost system. This is the 8-step process I use before I approve an EPEVER controller, a LiFePO4 bank, a Bluetti-style solar generator, or a Denver EV charger job.
It will not pick the product for you. It will keep the cheap quote from becoming the expensive one.
When I first started buying off-grid gear, I assumed the lowest-priced 40A MPPT was the best choice. Three budget overruns later, I learned about total cost of ownership. The controller was cheap. The reprogramming, return shipping, and missed installation window were not.
Step 1: Define the load and the backup window
Start with daily kWh, not panel wattage. List every load: inverter idle draw, fridge duty cycle, Starlink, lights, pumps, tools. Multiply watts by hours. Add 20 to 30 percent for inefficiency and cloudy days. For B2B, add future load.
Checkpoint: You can state peak watts and daily kWh on one line. If not, do not size anything yet.
Step 2: Size the epever 40a mppt solar charge controller before you buy the label
An epever 40a mppt solar charge controller is not a universal part. At 12V nominal, 40A is roughly 480W of charge power. At 24V, it is closer to 960W. Check PV array Voc at record cold, Isc, max PV input voltage, and the controller max PV wattage. Leave 15 to 20 percent headroom.
Most people ignore temperature coefficient. A 150V controller can be exceeded on a cold morning. I am not 100% sure your exact model has the same input limits, so verify the datasheet.
Checkpoint: Array Voc cold is below the controller max PV voltage. If not, rewire series and parallel.
Step 3: Set epever lifepo4 settings before the first charge
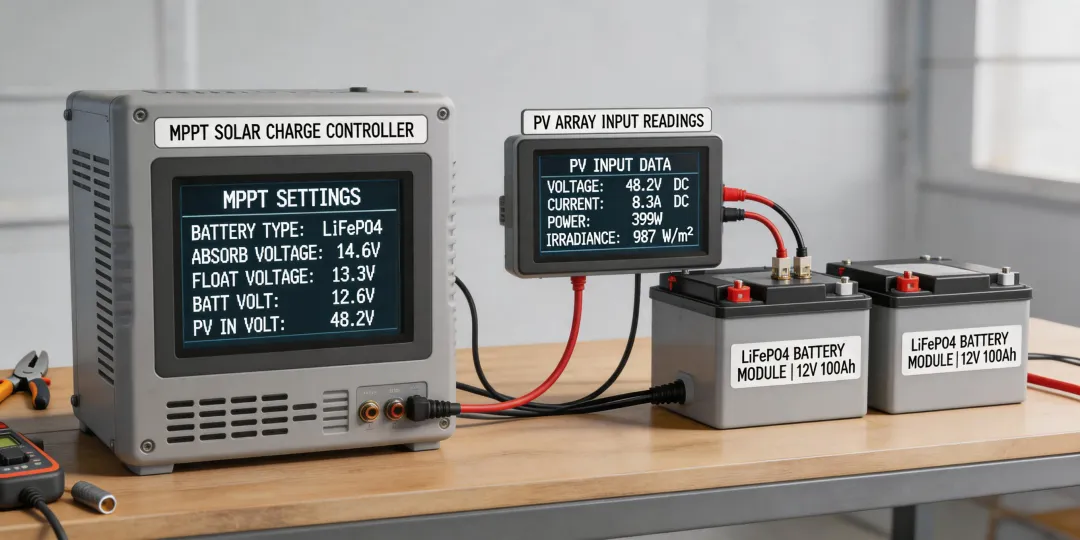
How you set epever lifepo4 settings matters more than the label on the box. Many EPEVER MPPT models use User mode. Some newer units have a Li setting. For a 12V LiFePO4 bank, typical starting points are absorption 14.2 to 14.6V, float 13.5 to 13.6V, equalization off, and temperature compensation off or 0mV per °C per cell. But the battery BMS spec wins.
EPEVER manuals for many MPPT models include a User mode for LiFePO4; some newer units have a Li setting. As of January 2025, verify your exact model because firmware changes. LiFePO4 charging is CC-CV. Most 12V drop-ins list absorption around 14.2 to 14.6V and float around 13.5 to 13.6V, but the BMS spec wins.
Set low voltage disconnect and reconnect to match the BMS. Save the settings, disconnect solar, and confirm them with the MT50 or app. Do not leave the default sealed or AGM profile. That is a $500 mistake I have seen twice.
Checkpoint: You have a screenshot or written log of every charge parameter before the first full charge.
Step 4: Answer the real question: how do you charge a lifepo4 battery?
How do you charge a lifepo4 battery? With CC-CV, no equalization, and temperature awareness. Solar alone is not enough in winter. Plan an AC charger, alternator DC-DC, or generator. Do not charge below 0°C unless the battery spec says low-temp charging is allowed.
Check charger voltage. 14.6V is not safe for every 12V drop-in. Some BMS units will disconnect and look like a failure. Others will just age faster.
Checkpoint: Write the charge source, voltage, current, and temperature cutoff in the job file.
Step 5: Compare bluetti solar generator amazon prime day deals against components
A bluetti solar generator amazon prime day deal can be a good fit for a small backup or mobile kit. But compare TCO. Prime Day price plus expansion battery plus solar panels plus shipping plus warranty service plus replacement in five years versus a component system with an EPEVER controller, LiFePO4 battery, inverter, and serviceable parts.
I am not saying one always wins. I am saying the deal price is not TCO. If the generator cannot be repaired locally, add downtime cost. If the component system needs programming, add labor.
Checkpoint: You have compared five-year cost, not checkout cost.
Step 6: Price denver ev charger installation like a project
denver ev charger installation needs a permit, load calculation, and licensed electrician. Hidden costs include panel upgrade, trenching, conduit run, permit fee, inspection, and utility coordination.
For Denver specifically, check the city permit office and Xcel Energy program status as of January 2025. Rules and rebates change. Prices vary by panel capacity and run length. I have seen quotes where the charger was $500 and the install was $2,000. The charger is not the project.
Checkpoint: Get a load calculation and permit scope in writing before you compare quotes.
Step 7: Build a TCO spreadsheet and force vendors into the same scope
Build a TCO spreadsheet. Columns: unit price, shipping, tax, mounting, wiring, fuses and breakers, labor, programming, monitoring, warranty, expected replacement, downtime, disposal. Force every vendor to quote the same scope.
The $500 quote turned into $800 after shipping, setup, and revision fees. The $650 all-inclusive quote was actually cheaper. I now calculate TCO before comparing any vendor quotes. Our procurement policy requires three quotes minimum because of that lesson.
Checkpoint: No vendor wins on unit price alone. Ever.
Step 8: Verify for 30 days and audit the invoice
Most people ignore this step. Verify for 30 days. Log daily PV production, battery voltage at absorption, float, low voltage disconnect, and inverter faults. Check torque on terminals after thermal cycling. Audit the invoice against the PO.
In Q2 2024, we caught a $1,200 duplicate freight charge in a 30-day audit. That was not a vendor scam. It was a process gap. We did not have a formal invoice-to-PO check. Now we do.
Checkpoint: Schedule the review before you pay the final invoice.
Common mistakes to avoid
- Using equalization on a LiFePO4 bank. Do not do it unless the battery manual explicitly says so.
- Buying an MPPT by amp rating only. Voltage, array Voc, and temperature matter.
- Assuming a Prime Day price is the final cost. Shipping, expansion, and warranty service are real line items.
- Forgetting the Denver EV charger permit and load calculation. That is where budget overruns start.
- Skipping low-temp charge cutoff. LiFePO4 does not like being charged below freezing.
- No 30-day audit. You will miss duplicate charges, wrong settings, and underperforming arrays.
Final check before you approve the order
Can you explain the full TCO to your finance lead in one page? Can your installer show the EPEVER LiFePO4 settings, the PV cold Voc calculation, and the EV charger permit scope? If not, the quote is not ready.
That is the checklist. Not perfect. But it has saved us more than any single vendor discount.