-
Who Needs This Checklist?
-
Step 1: Match the Controller to Your Solar Array Voltage
-
Step 2: Confirm Battery Voltage Compatibility
-
Step 3: Verify LiFePO4 Charging Profiles (This is a Big One)
-
Step 4: Check the Load Terminals and Function
-
Step 5: Know Your Solar Inverter Function (If You Need AC Power)
-
Step 6: Order the Right Accessories (Don't Forget the MT-50)
-
Step 7: Verify Vendor and Shipping Terms
-
Bonus for the Curious: Solar Basics (and a Fun Kid Activity)
-
Important Caveats & Common Mistakes
Who Needs This Checklist?
If you're like me—an office administrator or a small business owner tasked with buying an MPPT solar charge controller for the first time—this checklist is for you. I handle purchasing for a 40-person company, and last year I was suddenly told we needed an off-grid power solution for a remote workshop. I had no solar experience. My background is ordering office supplies and managing vendor relationships.
This guide covers the 7 steps I now use to specify and buy an Epever charge controller, specifically the 30A MPPT model, for a straightforward off-grid system. I'll walk you through the process so you don't make the same mistakes I did.
Step 1: Match the Controller to Your Solar Array Voltage
This is where I almost went wrong. The Epever 30A MPPT controller has a maximum input voltage. You need to know the VOC (Open Circuit Voltage) of your solar panels and how you're wiring them (series or parallel).
For the Epever 30A model, the max PV input voltage is typically 100V or 150V, depending on the specific model (e.g., the 'AN' series is often 100V, the 'BN' series 150V). (Should mention: always check the datasheet for your exact model number. I learned this the hard way.)
Checkpoint: Calculate your array's total VOC in the coldest conditions (cold temps increase voltage). Ensure it stays below the controller's limit with a 20% safety margin.
Step 2: Confirm Battery Voltage Compatibility
Most Epever MPPT controllers auto-detect 12V or 24V battery banks. But here's the thing: they don't support 48V systems out of the box for all models. The 30A unit is primarily for 12V or 24V.
In my experience, this is a surprisingly common gotcha for buyers who assume the controller will just 'work' with their battery setup. If you're running a 48V system, you'll need a different model or a different wiring configuration.
Checkpoint: Confirm your battery bank voltage (12V or 24V). The controller will handle the rest automatically, but double-check the manual to ensure your specific model supports it.
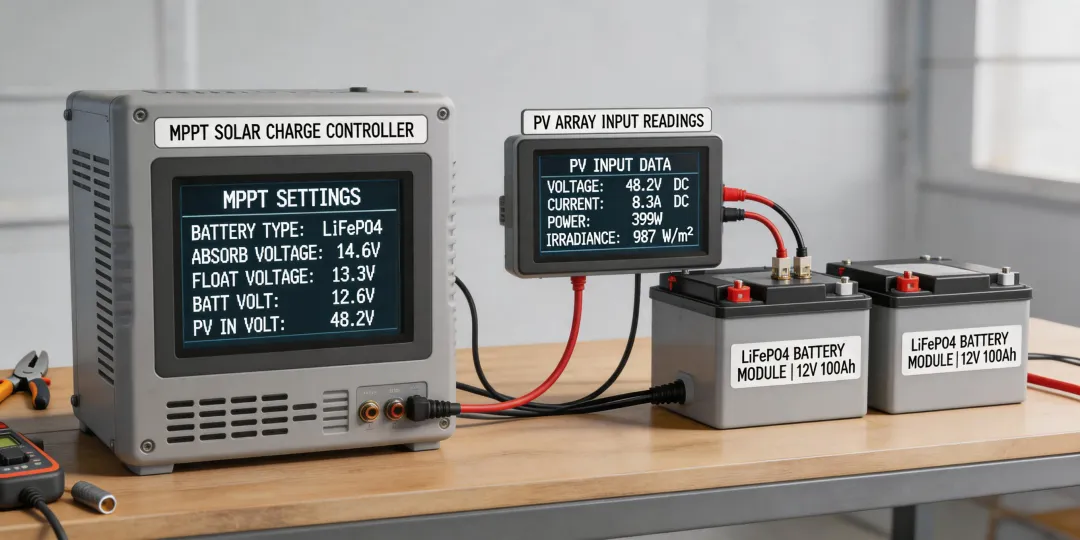
Step 3: Verify LiFePO4 Charging Profiles (This is a Big One)
The key advantage of Epever controllers is their flexible battery settings, especially for LiFePO4 lithium batteries. Not all solar controllers handle lithium well—they can be programmed with incorrect absorption or float voltages, which damages the battery.
The Epever 30A MPPT has a 'User' setting for battery type. You can manually set the Bulk, Absorption, Float, and Low Voltage Disconnect parameters. For LiFePO4, you typically want:
- Bulk/Absorption: 14.4V (for a 12V bank)
- Float: 13.8V
- Low Voltage Disconnect: 11.0V
However, I should add: always verify these values with your specific battery manufacturer's spec sheet. Using the wrong profile will kill your battery.
Checkpoint: If using LiFePO4, confirm the controller is set to 'User' mode, and input the correct voltage parameters from the battery manual.
Step 4: Check the Load Terminals and Function
Many admin buyers (like me) overlook the load output. The Epever controller can power a small DC load directly (like LED lights or a water pump) and has a programmable LVD (Low Voltage Disconnect) to protect the battery from over-discharge.
But here's the nuance: the load output is limited. On the 30A model, it's usually rated for 30A as well, but you need to check if it's a shared budget. If you're using the load output, factor that into your system sizing.
Checkpoint: Will you use the load terminals? Check the continuous and surge current ratings in the manual.
Step 5: Know Your Solar Inverter Function (If You Need AC Power)
A critical distinction: the Epever charge controller is a DC-to-DC device. It takes solar DC power and charges a battery bank. It does not output AC power. If you need standard 120V AC outlets (for tools, computers, etc.), you need a separate solar inverter.
The way I see it, system integrators often assume this is obvious. But for a buyer who isn't a tech translator, it's a frequent source of confusion. The charge controller and inverter are two separate boxes.
Checkpoint: If your goal is to run AC appliances, make sure your purchase includes an inverter, not just the MPPT controller.
Step 6: Order the Right Accessories (Don't Forget the MT-50)
The controller itself is a box with terminals. To program or monitor it easily, you'll want an external display. The Epever MT-50 is the standard remote meter. It plugs in via an RJ45 cable and allows you to change settings without needing to be near the unit.
I didn't order this initially. (Oh, and the controller comes with a very basic LCD that shows a few things, but changing settings on it is tedious.)
Checkpoint: Add the MT-50 remote meter to your order. It's a small cost that saves a lot of headaches.
Step 7: Verify Vendor and Shipping Terms
From my purchasing experience, this is where small orders can get uncomfortable. When I was ordering for our 40-person office, I found a great price on an Epever 30A unit from a new vendor. After the third late delivery from the same vendor, I was ready to give up on them entirely. What finally helped was specifying delivery windows in the PO.
Some tips for this specific product:
- Shipping weight: The controller is around 1.5-2 kg. Factor this into shipping costs.
- Warranty: Epever typically offers a 2-5 year warranty. Confirm this with the seller.
- Invoice compliance: Make sure the vendor can provide a proper commercial invoice (for tax and expense reporting).
Checkpoint: Get written confirmation on warranty length and shipping timeline before placing the order.
Bonus for the Curious: Solar Basics (and a Fun Kid Activity)
If you're explaining this to a team or even trying to get a kid interested in solar, there's a great tool: preschool solar system coloring pages. It's a low-stakes way to introduce the concept of the sun as an energy source. You can find printable pages online that show the planets orbiting the sun, which visually explains the concept of our solar system.
This is a tangent, but a helpful one for internal communication. It helped me explain to my R&D team lead why solar was relevant for our remote site.
Important Caveats & Common Mistakes
1. Don't cheap out on cables. Use appropriately sized solar cables to minimize voltage drop. A $30 cable can cost you $100 in lost power over a year.
2. Don't assume compatibility with all battery types. The 'User' setting on Epever controllers is flexible, but it's not magic. Some battery brands require specific charge profiles that may not be achievable.
3. Verify current pricing. Prices as of January 2025, but verify current rates. The Epever 30A MPPT is typically in the $80-120 range (based on major distributor quotes, January 2025; verify current rates).
4. This checklist is for small systems. For a 48V grid-tie or large commercial installation, you need a different spec process. This is for a single off-grid application.
And one last thing: if you're also trying to figure out how much to install an EV charger at home, that's a completely separate project with its own electrical and permitting requirements. The Epever charge controller won't help with that.