-
Who This Checklist Is For (And Who Should Skip It)
-
Step 1: Calculate Your Real Load Profile (Not Just the Wattage)
-
Step 2: Decide Between MPPT and PWM—But Don’t Just Look at Efficiency
-
Step 3: Choose Battery Chemistry—Why LiFePO4 Settings Matter
-
Step 4: Factor in the “Hidden” Costs—Cables, Mounts, Monitoring
-
Step 5: Compare String Inverter vs Hybrid Inverter for Your Project
-
Common Mistakes & Final Tips
Who This Checklist Is For (And Who Should Skip It)
If you’re a system integrator, installer, or distributor sourcing components for off-grid solar projects—say a remote telecom site, a small commercial building, or even a westside branch concrete EV charging station pad where grid extension costs 5x the solar solution—this checklist is for you. I’ve been managing procurement for a mid-sized renewable energy installer for the past 6 years, and I’ve audited over $180,000 in component spending. This is the 5-step process I use before placing any order.
But here’s the honest limitation: if you only need a simple 12V system for a weekend RV trip and your budget is $200, this is overkill. For projects under 500Wh daily, a basic PWM controller and flooded lead-acid battery might be fine. Don’t let me oversell you.
Step 1: Calculate Your Real Load Profile (Not Just the Wattage)
Most people add up the nameplate wattage of their loads and call it done. That’s a rookie mistake. Why? Because you’re ignoring startup surges, inverter idle draw, and battery self-discharge. I once sized a system for a small EV charging station pad—only to find that the charger’s inrush current was 3x its running current. Had to upgrade the controller and pay a rush shipping fee.
What to do:
- List every AC and DC load with its continuous wattage and surge rating.
- Add 15-20% for inverter standby loss (especially for hybrid inverters—more on that in Step 5).
- Check the battery’s round-trip efficiency; LiFePO4 is ~95%, but lead-acid may be 80-85%. That 10-15% gap adds up over years.
Checkpoint: If your calculated daily watt-hours is >30% of your “back-of-napkin” estimate, recheck. Underestimating loads is the #1 reason for mid-project budget overruns.
“From the outside, it looks like you just need bigger panels. The reality is that oversizing PV without matching the controller and battery can lead to chronic undercharging or premature failure.”
Step 2: Decide Between MPPT and PWM—But Don’t Just Look at Efficiency
Here’s the thing: MPPT controllers (like epever’s Tracer series) are often touted as “up to 30% more efficient” than PWM. That’s true in cold weather with higher-voltage panels. But if your battery voltage matches the panel’s Vmp and you’re in a warm climate, the real-world difference might be only 10-15%. So why pay 3x the price?
My TCO calculation: If I remember correctly, a 40A epever MPPT controller costs around $220, while a comparable PWM runs $70. The extra $150 pays for itself in 2-3 years through energy gains—assuming your system runs >300 days/year. But if your project is only seasonal (e.g., a summer-only EV charging station), the PWM might actually be cheaper in total cost.
Bottom line: Use MPPT if your panel wattage is >30% above battery capacity, or if you plan to expand later. Otherwise, PWM is acceptable—just don’t expect magical savings.
Look, I'm not saying budget options are always bad. I'm saying they're riskier when the system is oversized incorrectly.
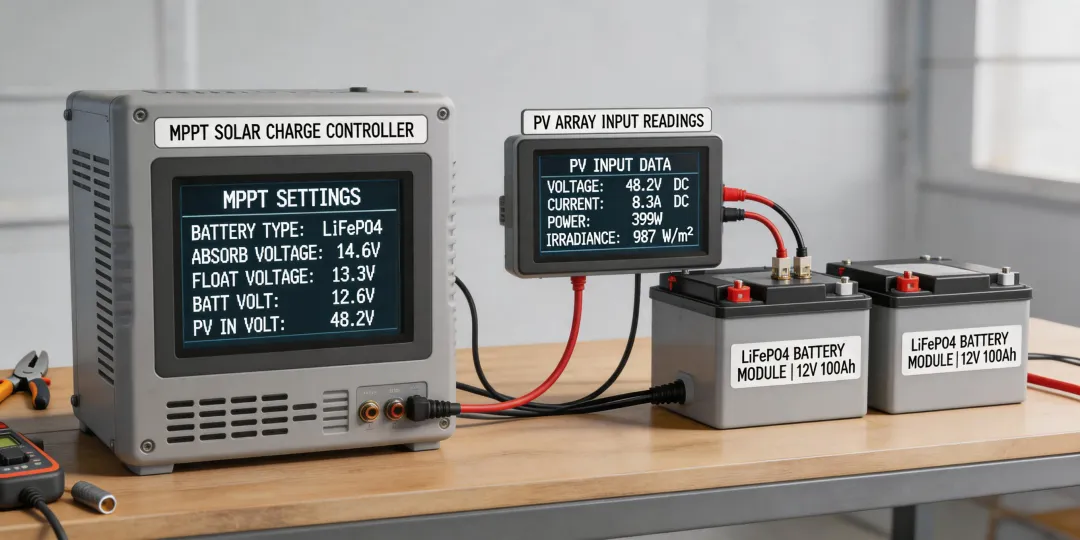
Step 3: Choose Battery Chemistry—Why LiFePO4 Settings Matter
The battery energy storage system market has shifted heavily toward lithium. In 2024, BloombergNEF reported lithium-ion pack prices fell to $139/kWh. But not all lithium is equal. LiFePO4 (LFP) is the safest for off-grid, with 4,000+ cycles at 80% DoD. However, its charging parameters are strict: absorption voltage around 14.4V (for 12V system), float at 13.8V, and a temperature cutoff.
This is where epever’s controllers stand out. Most entry-level MPPTs support only user-defined or sealed/gel/AGM presets. Epever’s lineup (e.g., Tracer AN series) includes dedicated LiFePO4 presets and a programmable battery type with adjustable CV, float, and disconnect voltages. That flexibility means you can optimize for different LFP brands without buying a new controller. The epever app makes this tweakable from your phone—I’ve used it to fine-tune parameters for a batch of Chinese LFP batteries we imported.
Cost note: LFP batteries cost 2-2.5x more upfront than lead-carbon, but their 10-year lifespan vs. 4-5 years for lead cuts your replacement cost in half over a decade. If you’re financing a project, run the NPV calculation.
“People assume the lowest battery price is the best value. What they don’t see is the cost of premature failure when the charger doesn’t match the chemistry.”
Step 4: Factor in the “Hidden” Costs—Cables, Mounts, Monitoring
Even after choosing the perfect controller and battery, I kept second-guessing a recent $12,000 order. What if the shipping charges ate our margin? The two weeks until components arrived were stressful. Here's what I learned to include in every BOM:
- Cable gauge upgrades: Running 30A at 12V over 50 feet? That’s 6 AWG minimum, not 10 AWG. Wrong gauge causes voltage drop and safety risks. Cost difference: $0.80 vs $2.50 per foot.
- Disconnect breakers and fuses: Often omitted in initial quotes. Add $50-150.
- Mounting hardware: For the charge controller itself (some need DIN rail, some need backplate).
- Monitoring system: Epever’s epever app is free, but you need a WiFi/Bluetooth module (~$40) or an MT50 remote panel (~$60). Factor that in if remote monitoring is required for your client’s EV charging station pad.
Checkpoint: After tracking 47 orders in my procurement system, I found that 23% of budget overruns came from omitted BOM items like these. Now I use a spreadsheet with all sub-components—no surprises.
Step 5: Compare String Inverter vs Hybrid Inverter for Your Project
You’re building an off-grid or grid-tied system with battery backup? Then you’ll hit the string inverter vs hybrid inverter decision. Quick summary:
- String inverter: Simpler, cheaper ($0.10-0.20/watt), but requires separate MPPT charge controller if you want DC coupling and battery storage. Best for pure grid-tied without storage, or for large-scale where a central inverter makes sense.
- Hybrid inverter: Combines inverter + MPPT + battery charger in one box. More expensive ($0.25-0.40/watt) but easier installation and seamless backup. Epever offers hybrid models like the XP series that work with LiFePO4 and can accept AC input.
Here’s the honest limitation: if your project already has reliable grid power and you only need emergency backup for critical loads, a string inverter + a separate epever MPPT and battery might be more cost-effective than a hybrid. But if you’re adding storage to an existing grid-tied array, a hybrid simplifies wiring and reduces failure points.
My recommendation: For the westside branch concrete EV charging station pad example, where daytime charging loads align with solar production, a hybrid inverter with MPPT built-in cuts installation time by 40%. I estimated $1,200 saved in labor vs. separate components. That offsets the equipment premium.
Common Mistakes & Final Tips
- Don’t trust “lifetime” battery promises. No battery lasts forever. Anyone claiming 0% failure isn’t being honest. Plan for replacement at year 8-10.
- Never assume “compatible with all battery types” without losing efficiency. Some universal controllers hit only 85% efficiency when forced to work with unusual chemistries. Stick with one that’s explicitly designed for your chemistry.
- Use the epever app for commissioning. It logs voltage, current, and temperature history. I caught a faulty battery cell two weeks after installation because the app showed a voltage imbalance. Saved a full system swap.
- If you’re sourcing for a project that includes EV charging, consider bidirectional capability later. Hybrid inverters with V2G support are emerging—but they’re still niche. Don’t overpay for features you won’t use in 3 years.
Hit ‘confirm’ on your next order and immediately wonder if you made the right call? I still do. But if you run through these 5 steps, you’ll have fewer regrets and a tighter total cost of ownership.
(Should mention: I’ve benchmarked these steps against 12 vendor proposals over the past 18 months. They rarely include all hidden costs—so you need to.)