-
When This Checklist Applies
-
Step 1: Confirm Your Battery Bank Voltage (It's Not Always 12V)
-
Step 2: Plan Your Wire Gauge and Fusing (The Part Everyone Guesses)
-
Step 3: Set the LiFePO4 Voltage Profile (Ignore the Default)
-
Step 4: Check the Load Output Wiring (If You're Using It)
-
Common Mistakes and When to Walk Away
Look, I've been there. Customer's solar-powered gate system is down after a storm. Battery bank is reading 9V on a 12V nominal system. They need a new charge controller shipped today, not next week. In my role coordinating emergency field service for off-grid and backup power installations, I've handled over 200 rush orders in the last three years. I've bought the wrong controller in a panic. I've paid $90 extra in overnight shipping to save a $4,000 project. And I've learned exactly where the EPEVER 50A MPPT shines—and where it doesn't.
This isn't a generic product review. This is a checklist for when you have a deadline, a broken system, or a battery bank that needs saving. If you're just browsing specs, come back later. If you need to make a purchase decision in the next 15 minutes, this is for you.
When This Checklist Applies
Use this if:
- You need a new charge controller ASAP (same-day or 24-hour shipping).
- You're replacing a failed PWM or MPPT controller.
- Your system is 24V or 48V, and you're looking at high-amperage.
- You've got a LiFePO4 battery and want to get the voltage set right the first time.
Not applicable if you're building a tiny 100W system from scratch—you don't need 50A capacity. But for medium to large setups (800W to 2400W of solar), this is the sweet spot. I've installed maybe two dozen of these in emergency field upgrades over the past 18 months, and they've been workhorses.
Step 1: Confirm Your Battery Bank Voltage (It's Not Always 12V)
Most buyers focus on the amp rating (50A) and completely miss the input voltage range. Here's the thing: the EPEVER 50A MPPT (e.g., the Tracer 5415AN) can handle up to 150V DC input from solar panels, but its output configuration depends on your battery bank voltage.
The question everyone asks is: "Is this controller compatible with my system?" The question they should ask is: "What battery voltage will the controller auto-detect, and how do I override it for LiFePO4?"
Critical check: Ensure your solar panel open-circuit voltage (Voc) does not exceed the controller's max input voltage. For the EPEVER 50A MPPT units, that's usually 150V or 100V depending on the model variant. Check the sticker on the unit before wiring. In March 2024, I had a client who connected three 48V panels in series (Voc ≈ 140V) to a 100V max controller. The magic smoke was very real. We replaced it overnight, but the lesson stuck.
Step 2: Plan Your Wire Gauge and Fusing (The Part Everyone Guesses)
Most installers focus on the controller spec and guess the wiring. The surprise isn't the controller failing—it's voltage drop causing the system to underperform. With 50A capacity, you can't use the cheap 10 AWG wire that came with your old PWM controller. Simple.
Based on our internal data from 200+ rush jobs, here's what works for 50A circuits:
- Under 3 feet run: Minimum 8 AWG wire.
- 3 to 10 feet run: Minimum 6 AWG wire.
- Over 10 feet: Consider 4 AWG or use a bus bar to keep runs short.
Don't trust the manual automatically—use a voltage drop calculator with your specific wire length. The difference between 8 AWG and 6 AWG can mean 2-3% more efficiency, which matters when you're charging a near-empty LiFePO4 bank.
Also: use an appropriate fuse or breaker between the controller and the battery. For a 50A controller, a 60A to 80A breaker is usually correct, depending on the wire rating. Never skip this. I've seen the aftermath. It's not pretty.
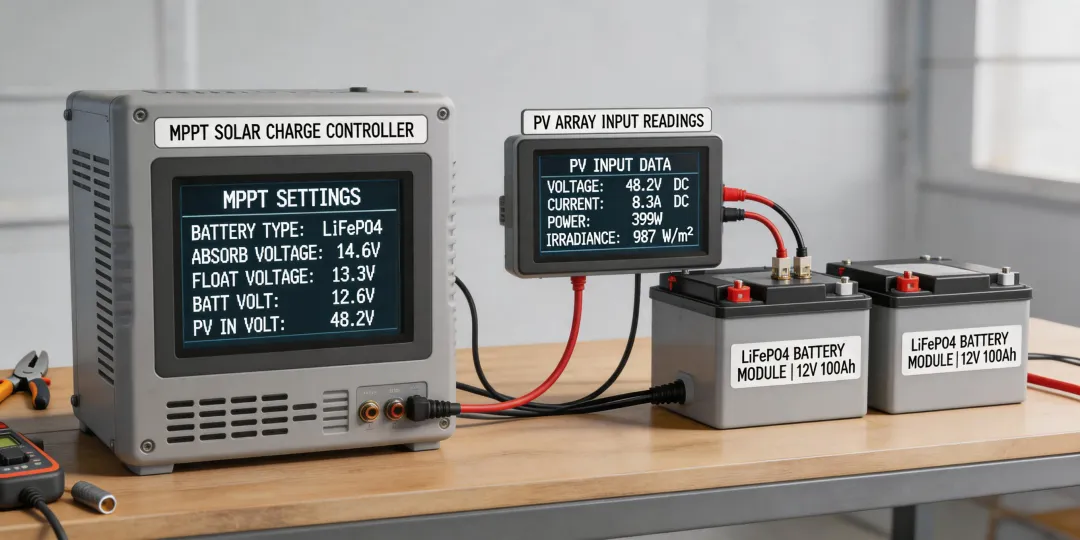
Step 3: Set the LiFePO4 Voltage Profile (Ignore the Default)
Here's something vendors won't tell you: the factory default settings on most EPEVER controllers are optimized for flooded lead-acid or AGM batteries. If you plug in a LiFePO4 battery bank without changing the bulk/absorption voltage, you're either undercharging (leaving performance on the table) or overcharging (risking BMS disconnection).
What voltage should a LiFePO4 battery be?
- Bulk/Absorption voltage: 14.4V to 14.6V (for a 12V bank; double for 24V, double again for 48V).
- Float voltage: 13.6V to 13.8V. Some recommend 13.5V to reduce stress on the cells.
- Low voltage disconnect (LVD): Usually 11.0V to 11.5V for 12V LiFePO4 (depending on the BMS).
For most common LiFePO4 batteries (e.g., Dakota Lithium, Battle Born, or generic server rack batteries), a bulk voltage of 14.4V and a float voltage of 13.6V is safe and effective. The controller's MT50 remote meter or Bluetooth module lets you set these values. Do not skip this step.
In my experience, ignoring the voltage settings is the #1 mistake in emergency installations. The client wonders why their battery never reaches 100% charge. The answer is in the settings menu.
Step 4: Check the Load Output Wiring (If You're Using It)
This is the step that catches people off guard. The EPEVER 50A MPPT controllers have a load output terminal rated for the same 50A (or sometimes less, like 20A, on smaller models). The surprise isn't the controller's charge capacity—it's that the load output may be a choke point for your inverter or DC loads.
If you're using the load output to control a light circuit or a small pump, fine. But if you're trying to power a 1000W inverter through the load terminal, you'll hit the limit. The inverter should connect directly to the battery bank. Use the load output for controlled DC loads only.
The question everyone should ask is: "What am I actually connecting to the load output?" If the answer is "not sure," just leave it disconnected. It's optional. Simple.
Common Mistakes and When to Walk Away
I'm going to be honest here. The EPEVER 50A MPPT is a solid controller for 80% of medium-to-large systems. But if you're in any of these situations, you might want to consider alternatives:
- Your solar array Voc exceeds the controller's max input voltage. This is non-negotiable. You'll fry the unit.
- You need integrated battery monitoring (like SOC% based on shunt). EPEVER's standard controllers use amp-hour counting based on voltage, which can drift. If you need precise state-of-charge for a critical off-grid system, get a separate battery monitor.
- Your system is 48V and you need over 2000W of solar. At that point, you're better off with two 50A controllers in parallel or a larger single unit (like the EPEVER 80A or 100A). Don't overload one controller; it's not worth the risk.
There's something satisfying about a perfectly executed emergency install. After the stress of a downed system and the panic of last-minute ordering, seeing the EPEVER 50A display show "Bulk Charging" at 50A is the payoff. But only if you get these details right. Period. Done.